Showing posts with label baking. Show all posts

Thursday, 5 December 2013

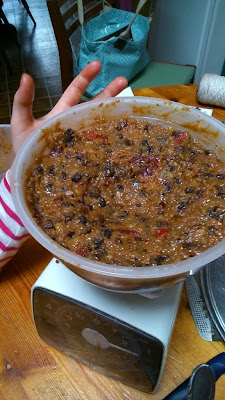
Irish Porter Cake

Oh ladies, what am I like!?!  I promised you this post weeks ago and I'm only getting around to it now.   All the Christmas crafting is keeping me very busy and is taking up every spare minute that I have.
Fortunately the best thing about baking a Porter Cake instead of a full Christmas cake is that it can be made at the very last minute and doesn't need to be plied with booze every week for three months.  It is also much lighter than a Christmas cake.  It can be iced and decorated just like a regular Christmas cake but we don't have many fans of heavy icing in our house so we just leave it plain and sometimes serve it with a scraping of butter.  Yumm


Ingredients:

  • 283ml / 1/2pt Guinness
  • 226g / 8oz Butter
  • 226g / 8oz Sugar
  • 226g / 8oz Raisins
  • 226g / 8oz Sultanas
  • 113g / 4oz Mixed Peel
  • Grated Rind of 1 Lemon
  • 453g / 1lb Flour
  • 2tsp Mixed Spice
  • 3 Eggs
  • 1/2tsp Bread Soda
Method:

  • Preheat oven to 150°C and line and grease a 20" round tin. (Above we just used a square one  because we couldn't find the right one on the day...typical!!)
  • Heat the Guinness gently with the butter and sugar.
  • Stir in the cleaned fruit and lemon rind.
  • Stir until the butter and sugar are melted and then leave aside to cool.
  • mix all the dry ingredients together, except the bread soda.
  • Beat the eggs and add the bread soda and then stir into the cooled fruit mixture.
  • Make a hollow in the middle of the dry ingredients and stir in the fruit mixture.
  • Mix well before transferring to the prepared baking tin.
  • Cook for 2 1/2 to 3 hours covering with a piece of cardboard if you think it is browning too much on the top.
  • When a skewer comes out clean from the cake, remove from the oven and leave to cool for 10mins before removing from the tin.
This is yet another old family recipe that myself and my mother have made every single Christmas.  I hope that you enjoy it as much as we do.

Rosie xx

Wednesday, 20 November 2013

Irish (Suet Free) Christmas Pudding

Well just as I promised this is my Mum's Christmas Pudding Recipe which she has used for donkey's years and has always proved a massive success in your house on Christmas morning and as presents for friends and family.


Ingredients:
6oz/175g self raising flour
1 level tsp mixed spice
1tsp ground cinnamon
1/2tsp ground nutmeg
8oz/225g fresh white breadcrumbs
12oz/350g dark brown sugar
375g currants
375g sultanas
4oz/125g mixed cut peel
4oz/125g cherries, washed, dried and halved
2oz/50g chopped almonds
finely grated rind of 1 orange
finely grated rind of 1 lemon
8oz/225g margarine, melted and cooled a little
3 large eggs
2tbsp brandy
1/2pt/275ml Guinness or stout

  • Sieve the flour and spices into a large bowl
  • Add the breadcrumbs, sugar, fruit, nuts, orange and lemon rind and mix thoroughly.
  • Beat together the eggs, brandy and guinness.
  • Make a well in the centre of the dry ingredients and add the melted margarine and the egg mixture. mix thoroughly with a wooden spoon.
  • Cover and leave overnight in a cool room.
  • Next morning prepare 2 x 2 1/2 pt pudding bowls by greasing well with butter.
  • Grease two large pieces of greaseproof paper and make a large pleat crossways in it.
  • Give the pudding mixture a good stir once more.
  • Divide the mixture between the two pudding bowls, weighing each to make sure that they are the exact same size and weight so that they both have the same cooking time.
  • Push down the mixture well down in the bowls and bang them on the table so that there are no air gaps. 
  • Make a little dip in the centre of the mixture in the bowl before covering so that the puddings don't push the lid off the pot when they start rising.


  • Cover the bowl with the well buttered greaseproof paper, making sure that the crease runs down the middle of the bowl.
  • Tie a long piece of strong around the bowl very tightly as close to the rim as possible.

  • Place the plastic lid over the bowl and wrap the paper up and over the lid.
  • Fill two large pots to about a half way up the pudding bowls and bring to a strong simmer. 
  • Place an old saucer at the bottom of the pot to lift the pudding from the base of the pot and allow it to cook all the way around.  Make sure that there is no air bubbles caught under the saucer.
  • Cook the puddings for 7 hours with the water simmering all the time.  You will need to top up the water on a regular basis.
  • On Christmas Day cook the puddings for one hour more.
Because there is so much alcohol in these puddings if one is left uneaten it can be kept for the following year so long as it is kept in a clean airtight bowl.  We have done this many times and it has been perfect always and even improves over the year!!

Linking for the first time (hoping this will work) to Cosmos and Cottton.

Hope you enjoy.  There is still plenty of time left to cook yours.
Rosie xx


Wednesday, 15 May 2013

Fat Free Blueberry Muffins

I was delighted to find this recipe in Good Housekeeping's The Baking Book.  Sometimes I find muffins a bit too stodgy and sticky with the amount of fat or oil in it.  I was unsure how it would work but I decided to try it anyway.  It is super easy to whip up when time is tight and totally fail safe.  I've used this recipe several times now and I have changed the recipe very slightly, reduced the amount of sugar and lemon, as the original was a bit too sweet and the lemon was very overpowering.


I am the "Queen of Ugly Cakes"!!!
They may not look perfect but they are definitely yumdiddilyumscious!!  
They always look like the elephant man but the look doesn't affect the taste.

Fat Free Blueberry Muffins

2 medium eggs
250ml milk
200g golden granulated sugar
2tsp vanilla extract
350g plain flour
4tsp baking powder
250g frozen blueberries
finely grated zest of one lemon
  • Preheat the oven to 200°C. Line a 12 hole muffin tin with paper cases.
  • Put the eggs, milk, sugar and vanilla extract into a bowl and mix well.
  • In another bowl sift together the flour and baking powder, then add the blueberries and lemon zest. Make a well in the centre.
  • Pour the egg mixture into the flour mixture and mix in gently.  
  • Divide the mixture between the equally among the muffin cases.
  • Bake for 20-25 mins until risen and just firm.
  • Transfer to a wire rack and leave to cool completely.
Hopefully your muffins will look better than mine but I bet that they will taste gorgeous.
Enjoy.

Rosie

Thursday, 4 October 2012

Wiggly Teeth Scones

Both of my kids are loosing their baby teeth at the moment, ahhhh. They are finding it hard to bit into most things so I have to be really careful about what I give them to eat.  We call these Wiggly Teeth Scones because unlike normal scones the outside is not very hard and the inside is lovely and light and fluffy.  Perfect for lunch boxes.  I got the recipe from a Good Food magazine a few years ago and they called them The Ultimate Scone.  I don't think that I would because they don't rise very high like most scone recipes but they are perfect for little mouths.
Ingredients:
16oz self raising flour
1/4tsp salt
4oz butter, cold
2oz golden caster sugar
8floz buttermilk
4floz full fat milk
2 handfuls of sultanas
1 egg for glazing, slightly beaten
a little granulated sugar for sprinkling

Method:

  • Preheat the oven to 220°C
  • Tip the flour into a mixing bowl with the salt and butter.  Rub the butter into the flour until it resembles fine breadcrumbs.
  • Stir in the sugar and sultanas.
  • Mix together the buttermilk and full fat milk.
  • Pour in most of the milk into the centre of the flour mixture.  Not all of it because it may make it too wet.
  • Using a round bladed knife gently work the mixture together until it forms a soft dough.  If it is too dry you can always add in more milk but be very careful a little can make it too wet.  If it is too wet add in another handful of flour and work it in.
  • Take the dough out of the bowl and on a lightly floured surface knead 3-4 times to remove any cracks.
  • Pat the dough gently with your hands to the thickness of no less than 2,5cm.
  • Cut with a floured cutter and place on a baking tray.
  • Brush with the egg and sprinkle with a little granulated sugar.
  • Bake in the oven for 10-15 minutes.
  • Serve with butter and jam to kids with wiggly teeth and watch a lovely jammie smile appear on their faces.


Friday, 21 September 2012

Coconut And Apple Oaties

We all love oaties here in this house and I think that they are a great source of fibre for the kids.  With this recipe I thought that I'd combine a couple of my favourite ingredients; coconut, cinnamon and apples. The apples are a little soft after baking. This may not be to everyone's taste and if you prefer you can always leave them out.  They will taste just a good. I hope that you like them as much as we do.  So here goes...

Ingredients:
110g butter, softened
100g caster sugar
100g soft light brown sugar
1 egg
2btsp water
1/2tsp cinnamon
110g self raising flour
125g porridge oats
125g coconut
1 granny smith apple, peeled and chopped into small pieces

Method:

  • Preheat the oven to 180°C.
  • Soften the butter in a food mixer or a large bowl. 
  • Add the soft brown sugar and cater sugar and beat until light and fluffy.
  • Next add in the water, egg and combine well.
  • Using a wooden spoon mix in the flour, porridge oats, apples and coconut.  This will form a mixture like dough.
  • Take pieces of dough the size of walnuts and roll in your hands to make balls.
  • Spread these apart on two papered baking sheets.
  • Bake for 20mins.  They should be light golden brown but still slightly soft to touch in the middle.
  • Let them cool on the trays for a few minutes and then transfer them to a wire rack.
  • Sit with a lovely cuppa, put your feet up and delight in what a wonderful domestic goddess you are.


Monday, 3 September 2012

Cranberry and Raisin Oaties

Ingredients:
100g butter, softened
100g caster sugar
100g light brown caster sugar
1 egg
2tsp water
1tsp vanilla
250g porridge oats
110g self raising flour
1/2tsp salt
100g cranberries
75g raisins

Method:

  • Preheat oven to 180°C
  • Cream the butter in an electric food mixer until soft.  Add the sugars and beat until the mixture looks light and fluffy.
  • While still beating, add in the egg, water and vanilla.
  • Using a wooden spoon gently mix in the oats, flour, salt, cranberries ad raisins to form a stiff dough.
  • Line two baking trays with baking parchment.
  • Take pieces of dough about the size of walnuts, roll them in your hands to form balls and place them on the baking trays, leaving a space between each to let them spread.
  • Bake in the oven for 20-25 mins until golden brown but still slightly soft in the centre.  If you like yours crunchy like my kids do, leave them in for the 25 mins or a little longer.
  • Allow to cool on wire racks.  

Saturday, 18 August 2012

CraftyRie

I've just discovered this and I think that it is great idea a directory for all the mad crafters out there.    I've just spent hours looking through the different blogs.  Inspiring to say the least.  Pop over.  Believe me when I say that it's well worth it.  http://craftyrie.blogspot.com/
http://www.craftyrie.com/2011/10/universal-craft-blog-directory.html

Thursday, 28 June 2012

Raisin And Walnut Muffins

This recipe is for all walnut lovers and forgive me for not trying this out first but I am not included in this category.  My mother makes these all the time and loves them.  It's an old recipe that she found on a Prestige baking tin.  It's a slightly unusual and very easy recipe.  Hope that you enjoy.

Ingredients:
325g Plain Flour
100g Caster Sugar
1tbsp Baking Powder
1/2tsp Salt
1 Egg
325ml Milk
75ml Vegetable Oil
50ml Sweet Sherry
75g Walnut Pieces
75g Raisins

Method:

  • Sieve together the flour, salt, baking powder and sugar.
  • Beat the egg lightly and stir in the milk, vegetable oil and sherry.
  • Mix liquid into the dry ingredients.
  • Do not over mix
  • The mixture will appear slightly lumpy.
  • Stir in the walnuts and raisins.
  • Divide between the 12 muffin cups.
  • Bake at 200°C for 20/25mins.
  • Lift the muffins from tins and cool on a wire rack


Sunday, 24 June 2012

Chocolate Chip Muffins

Yipppee, finally I've managed to make up a recipe for Chocolate Chip Muffins that are light and fluffy.  Any recipe that I've tried before I found to be either too dense and heavy, too sweet or too moist.   By mixing up lots of different recipes and tweeking here and there I came up with this one.  Which proved to be so popular with the family that I had to be quick at getting my photo before they disappeared.

Ingredients:
350g Plain Flour
40g Good Quality Cocoa Powder
175g Caster Sugar
1tbsp baking powder
Pinch of salt
300ml Buttermilk
2 Eggs, Beaten
85g Butter, Melted
1tsp Vanilla Extract
100g Milk Chocolate, Roughly Chopped (You can use dark chocolate here but I use milk because my kids prefer it)


Method:
  1. Preheat the oven to 190°C and line a 12 hole muffin tin with cases.  I use cases because I find them much cleaner in the tin and when the kids are eating them.
  2. In a large bowl combine all the dry ingredients, the flour, baking powder, salt caster sugar and then sieve in the cocoa powder.  
  3. In a jug measure out 300ml of buttermilk and add in the eggs , vanilla and melted butter. Whisk together with a fork until well combined.  One thing that I learned the hard way was to take the buttermilk out of the fridge for about 15mins before baking because even if the melted butter has cooled, if it hit cold buttermilk it solidifies again. 
  4. Make a well in the centre of the flour mixture and pour in the the liquid.  The key here is not to overmix. Gently mix until just combined.
  5. Add in the chopped chocolate and give it only a light stir.
  6. With a ice-cream scoop divide the mixture between the muffin cases
  7. Bake for 25mins until risen.
  8. Take out of the oven and leave to cool for 5mins before taking out of the tray and onto a wire rack.


Monday, 4 June 2012

Apple Tart

My brother was home from Germany lately and the one thing that he wanted me to show him how to bake was a good old fashioned Apple Tart.  He came out to my kitchen and we had a great afternoon baking together.  I was going to take pictures of the end result but my student ate it all before I got a chance to.  So here is the recipe that I promised him that I would put up.

Ingredients:
4 Large Bramley Apples
4-5tbs Sugar
1tsp Mixed Spice or Cinnamon or 3 Whole Cloves whichever you prefer
300g Plain Flour
75g Butter
75g Baking Fat such as Cookeen
1 Egg, lightly beaten

NOTE:  for the pastry there should always be half the amount of butter or fat to flour.  For this apple tart I always use a mixture of both fat and flour because I find that it makes the pastry lighter and crispier.  But if I was to make a quiche I would use all butter and a egg and egg yolk to bind instead of water.

Apple Filling:
  1. Peel and slice the apples.  Keep back one apple to add later if you like a bit of a bite and not have them all stewed. Rinse them under the tap and drain thoroughly.  I do not add water to the apples when they are stewing as the apples themselves already contain enough juice and that along with the remaining water after rinsing is enough to stew them.
  2. Add in the sugar, cover with a lid immediately and put on a medium heat.  Some say that you should add a little lemon juice to the apples to stop them from browning but I've found that as long as you put the lid on the pot as quickly as possible, this is not a problem.
  3. After about 10mins take the apples from the heat.  Mix in your choice of spice and then taste a little to make sure it is sweet enough for you.  In this house we like it a little tart still.  
  4. If you like a bit of a bite in your apple tart, then now is the time to cut up your last apple and add it in.
  5. Leave to cool completely while you get on with the pastry.

Pastry:
There are two different ways to do the pastry.  By hand or in a blender.  It took me a long time to be converted to the way of the blender but now I would never look back because it takes a matter of only seconds in the blender.

Pastry By Hand:
  1. Before you begin put a dinner knife, water and butter in the fridge for a couple of hours to become very cold.  The key to very light crispy pastry is that everything must be cold.  Even your hands!!!.
  2. Weigh out the flour, butter and fat and place into a large bowl.
  3. Rub the butter and flour together between your fingers and your thumbs until they resemble breadcrumbs.
  4. Take the knife out of the fridge and adding a couple of tablespoons of water at a time, bind together using chopping movements.  It should not take very much water for it to come together.
  5. Feel the pastry, if it is crumbly then it needs more water but if it is a little wet then add a little extra flour.  But never ever knead because this will only make the pastry hard when cooked.
  6. Tip out of the bowl and roll into a ball.  Cover with cling film and place it in the fridge for a minimum of 1/2 hour.    
Pastry By Blender: 

  1. Before you begin put a jug of water and butter in the fridge for a couple of hours to become very cold.  The key to very light crispy pastry is that everything must be cold.
  2. Put flour and butter into the blender and whizz for 30sec until they resemble very fine breadcrumbs.
  3. Drizzle water a tablespoon at a time through the nozzle with the blender still on.
  4. Again this should take only take a few tablespoons in total but the only way to really know is to feel it.  If it is crumbly then it needs more water but if it is a little wet then add a little extra flour.
  5. Tip out the pastry and dust with flour before forming it into a ball, covering it in cling film and place in the fridge for at least 1/2 hour.

Forming The Apple Tart:
  1. 15mins before you want to make up your apple tart preheat the oven to 190° and put a heavy gauge baking tray into the oven.
  2. Flour and butter your flan dish.
  3. Cut away just a little over half of the pastry and roll out large enough to cover the base and sides of the dish.  Before filling it with apple, roll out the pastry for the top.
  4. Put the pastry into the bottom of the dish and ensure that it is pushed right into the side, being very careful not to tear.
  5. Brush the base of the pastry all over with the beaten egg.  This ensures the apple does not make the base soggy and soft.
  6. Fill up the case with the apple and even out.
  7. Carefully lift the top of the pastry by folding it over the top of your rolling pin and put it on top of the tart.
  8. Cut the excess and seal the tart at the same time by pressing the rolling pin along the edge of the dish.
  9. Make a hole in the centre of the tart to ensure air can get out and that the pastry doesn't puff up when cooking.  You can also make several fork holes around the top.
  10. To ensure that the case is completely sealed, make little indents by pressing a fork along the edges of the dish.
  11. Brush the top of the tart with beaten egg and sprinkle with sugar.  Decorate with any left over pastry.
  12. Bake for 30mins on top of the hot baking try.  The baking tray makes sure that the base of the tart is cooked at the same time as the top.


Thursday, 3 May 2012

My Mums Best Nut And Chocolate Cake


This was a favourite of ours as we were growing up.  It was the cake that my mother made most regularly, apart from her delicious apple tart of course.  Oh I'm getting hungry already.  Must head to the kitchen and see what's in the pantry!

Nut and Chocolate Ring Recipe

150g butter, softened
250g sugar
3 large eggs or 4 medium eggs
300g self raising flour, or plain flour with 1tsp of baking powder
a pinch of salt
2-3 tbsp. of milk 
150g mixed nuts, roughly chopped
150g chocolate, roughly chopped


Method:
Place all the ingredients except nuts and chocolate into mixing bowl and beat with a handmixer for 2-3 mins until well blended. Fold nuts and chocolate into the mixture. Grease and flour a 25cm ring mould. Transfer the mixture to the tin.

Temperature:  160C
Time:  60 - 75 mins until a metal skewer comes out clean